install.packages("gitcreds")Tutorial 1: Git, Github, and RStudio
R has a number of packages that facilitate its use with Git. git2r, gitcreds, gh, gert, credentials all work within R to allow the use of Git and GitHub. RStudio has good integration with both Git and GitHub and if you are working in an RStudio environment it is wise to use the integrated tools.
There are a number of steps to be completed before you can use Git and GitHub with R and RStudio. You need to make sure you have R and R Studio installed (I will assume this), you must get a GitHub account, then install Git on your personal computer, and then let RStudio know about your installation.
There is also a much more comprehensive guide to using Git and R at Happy Git and GitHub for the useR by Jennifer Bryan. See that for more detailed resources.
Installing Git
Different operating systems will have different methods for installing Git.
Windows
You can get an installer for Windows directly from the Git website.
However, a better option is to install “Git for Windows” which installs Git and some other tools, in particular a bash emulator. This makes the Windows version work in the same way as the Unix versions (Linux, MacOS), as the Git comes from the Linux world it is better to stay within the Linux/Unix way of doing things. It also means that learning transfers across platforms.
Accept the defaults except in the “Adjusting your PATH environment” question, select “Git from the command line and also from 3rd-party software”
Once it has installed open the windows command prompt or within the Terminal tab in RStudio then type:
Git version
to verify that it has installed.
Mac
It is probably the case that Git is pre-installed on your computer. To check you can open the terminal app which is in the Utilities folder in the Applications folder and paste in the following line. Alternatively you can use the terminal tab in the console window in RStudio and paster in the same line.
git --versionIf it is not installed you can install it using Homebrew, follow the instructions here or here. Or you can install Apples own XCode software, although the latter requires downloading a subtantial amount of material (3.21 GB).
Linux
It is probably the case that Git is pre-installed on your computer. However, if it is not use the appropriate package manager to install Git for your distro.
Let RStudio know about your Git installation
Windows
You may have to restart RStudio to let it look in the default place for the Git installation. Then you can go to RStudio’s Tool menu and down to Global Options. When you open that select the Git/SVN tab and you should see your window as in Figure 1. If it does not show this then use the Browse button to find the Git program in your Program Files. Make sure the “Enable version control interface for RStudio projects” button is ticked.
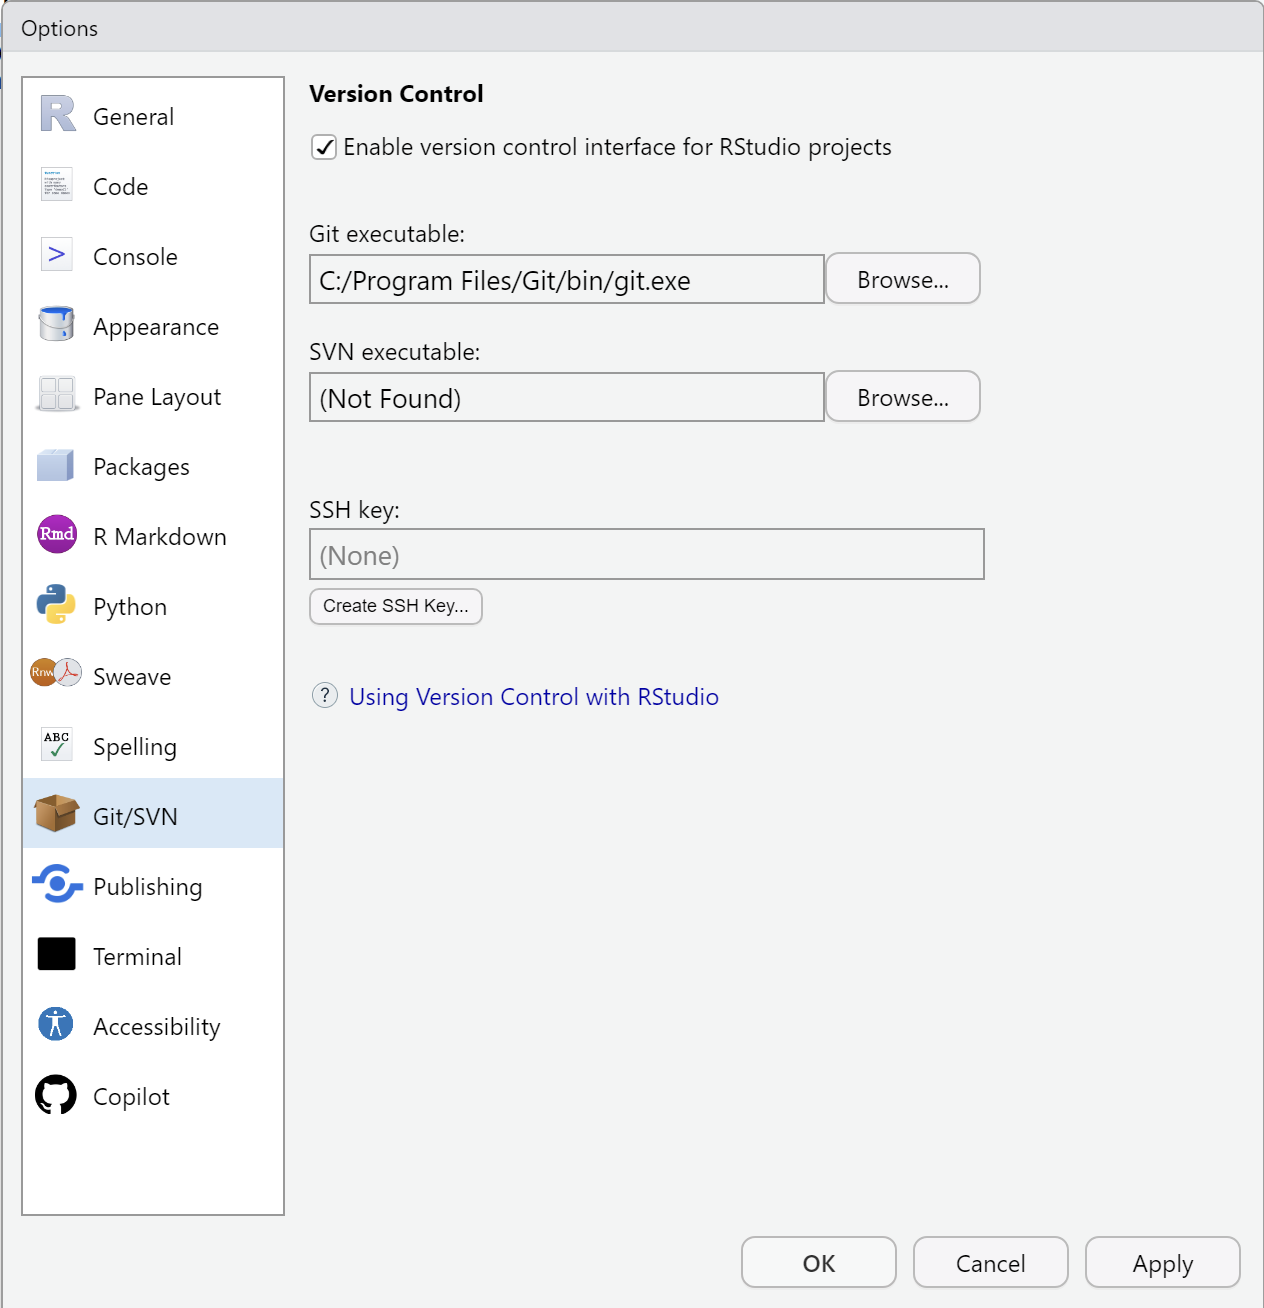
Once the dialogue box is correct click the Apply button.
Mac
In RStudio Terminal type or copy and paste
which gitIt should produce something like:
/usr/bin/gitor
/usr/local/bin/gitGo to RStudio’s Tool menu and down to Global Options. When you open that select the Git/SVN tab and you should see the dialogue box as in Figure 2. If it does not show this then use the Browse button to find the Git program. As these are hidden system files, the UNIX side of MacOS, you may need to access them using the Command+Shift+G key combination.
Make sure the “Enable version control interface for RStudio projects” button is ticked.
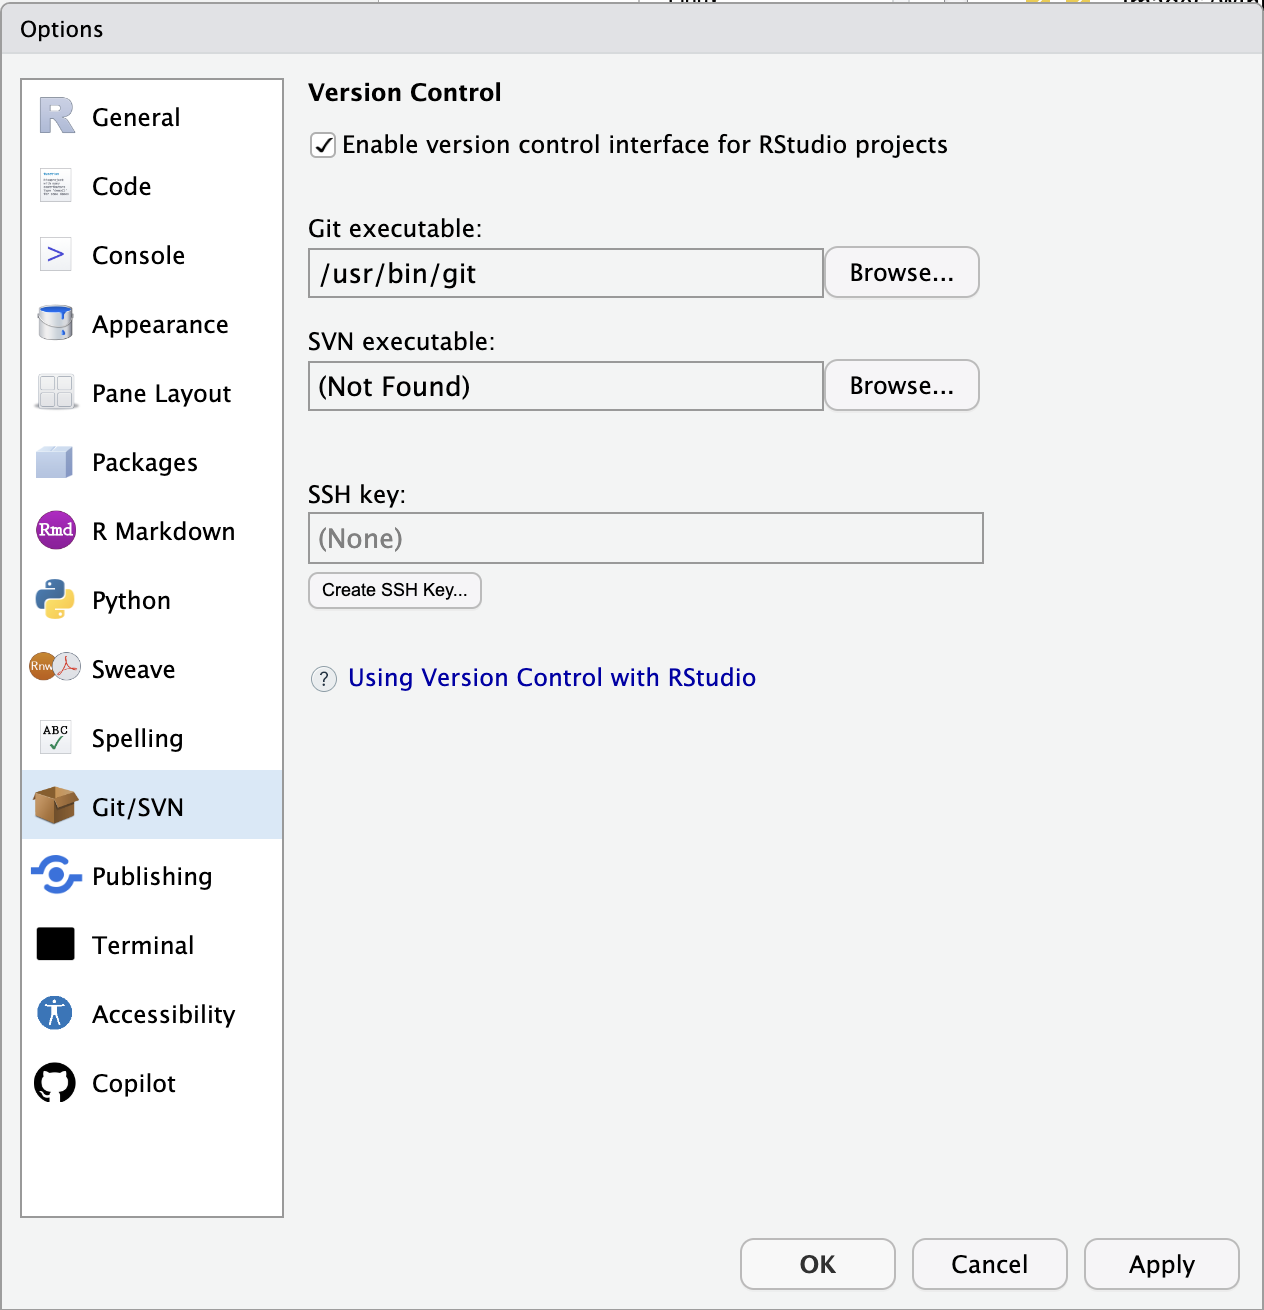
Once the dialogue box is correct click the Apply button.
Linux
To be added.
Let Git know who you are
We need to tell Git who we are, the best way to do this is using the Terminal in RStudio.
Paste
git config --global user.name "Gary McKeown"
git config --global user.email "g.mckeown@qub.ac.uk"
into the Terminal, replacing the user.name with your name and the user.email with the email you used to create your GitHub account. Then you can check that this has worked by using the following command.
git config --global --listUsing Git within RStudio
RStudio has good integration with Git and for the most part you should be able to do most things while using the RStudio interface. However, the RStudio interface does not implement all of the functionality that Git has; if more functionality is required it is always possible to use the Terminal within RStudio to give Git command line commands to achieve what is desired. The level of use you require will differ depending on the goals you have with Git. There are different workflows depending on your needs and the level of collaboration or product stability you require. For most academics there are often experimentation phases, at some stage there is need for collaboration and collaborative working, and more occasionally there is a requirement for a strong level of permanence and stability. Each of these represent different workflows.
Connecting Git to GitHub
Git can function on its own on your local computer as a versioning system to keep track of changes you make to your documents, both saving versions and keeping a log of the changes. However, almost always it is used in conjunction with an online server where you make changes in your local copy of the files and then push those changes to a remote online server somewhere that keeps a version of the files. This allows a version to be made publicly available and it allows multiple collaboartors to work on the same (or multiple) versions of a repository. Clearly one of the challenges that Git is designed to overcome is to keep track of the changes multiple people make in multiple copies of their local files and keep them synced to the main repository. The most popular, but not the only, online server that provides this service is GitHub (GitLab and Bitbucket are other popular alternatives).
Personal Access Tokens
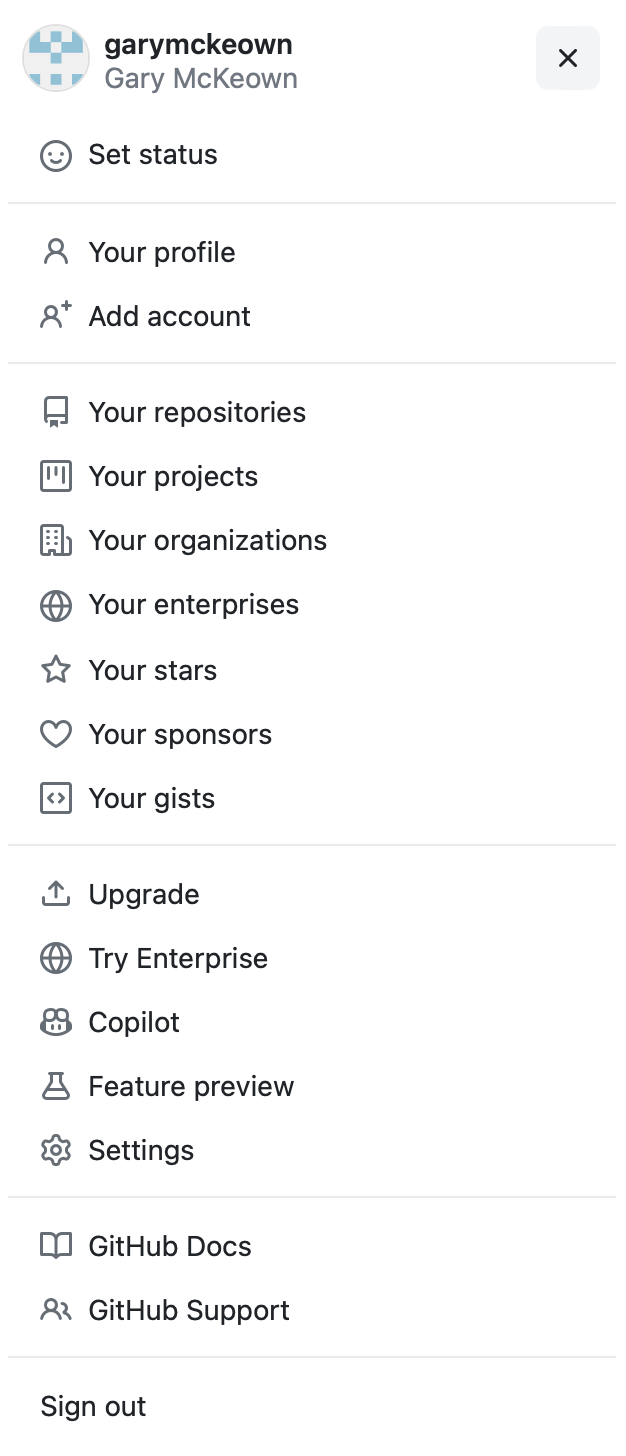
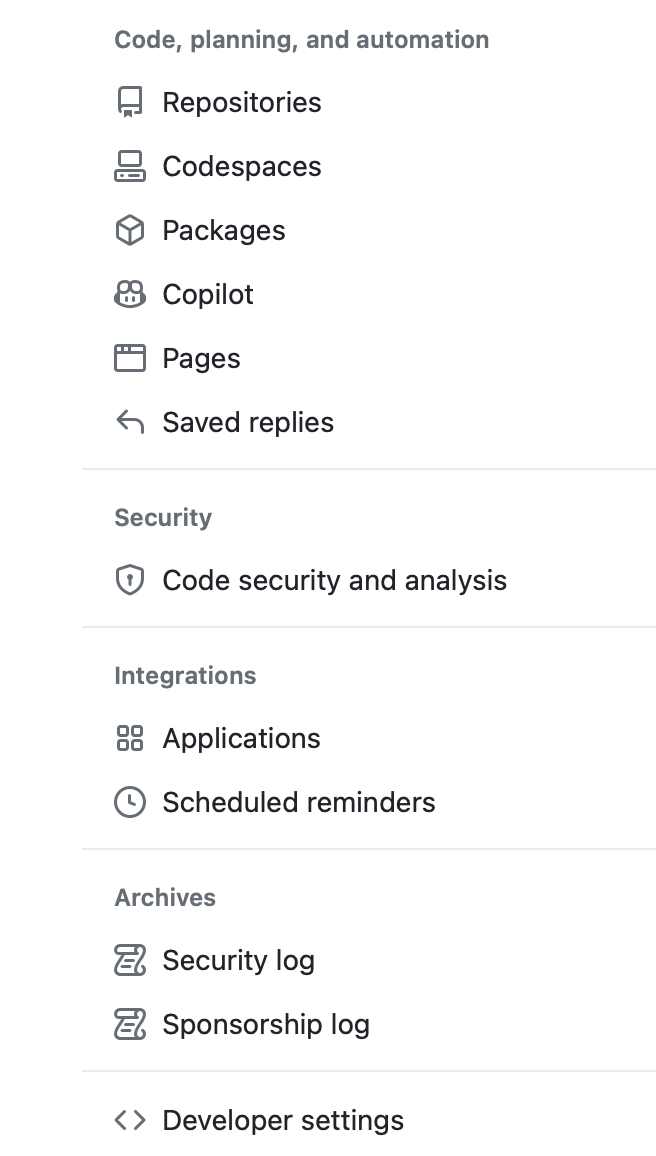
Recently GitHub increased their security protocols and now in order to be able to interact with your GitHub a count you need to have a thing called a Personal Access Token that serves as a credential letting GitHub know that you are who you say your are. These replaced passwords as a more secure access method. If you go to the Settings in your GitHub page accessed via the account menu at the top right (Figure 3 (a)). Once in Settings scroll to the bottom where you can see Developer Settings (Figure 3 (b)).
Developer Settings will show you a few options select Personal access tokens and Tokens (classic) and click on Generate new token (Figure 4).

You will be asked to give an expiration date for your Personal Access Token, this is giving you a time when you will need to update this, in essence it is a bit plike providing a date for when you need to change your password. If you are not concerned about security you can choose no expiration date or you can choose custom and put somethign for a year or so in advance. If security is a strong concern then you should get used to changing this regularly.
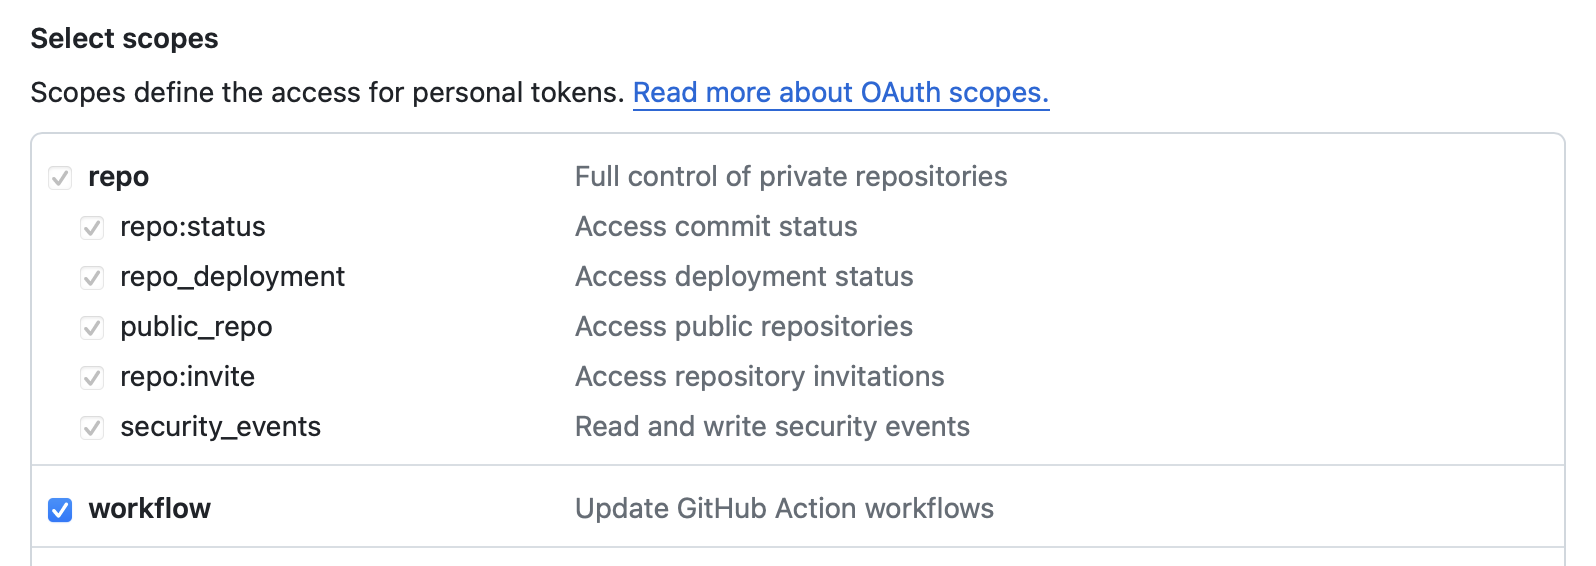
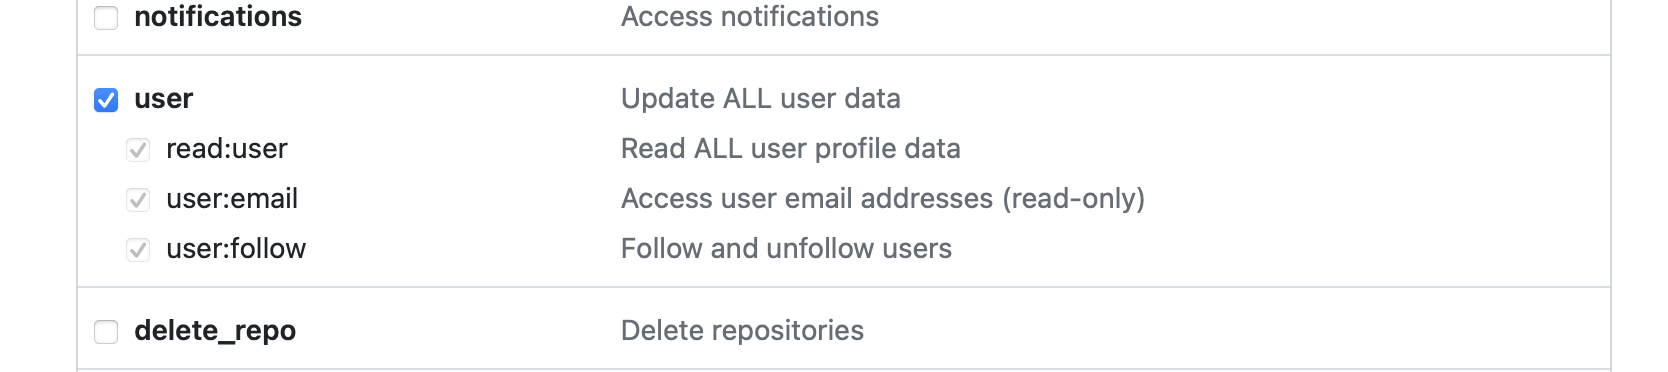
When it gives the options select “repo”, “user”, and “workflow” (Figure 5, Figure 6).
It will create a token like this:
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
Then you should copy it and in the R console install the gitcreds package.
Once you have that installed you can add the line
gitcreds::gitcreds_set()it will ask you to enter the token and you can paste your token into the console when it asks you to “Enter password or token:”
You should now be set up for working with GitHub, using the push and pull commands.
Joining GitHub and local Git together
The first thing you need to do is to set up a repository. You can do this in two ways you can create a new repository in GitHub and import it to your local machine. The alternative is to create a local repository and send it to GitHub. The former is the easier method and it is the better one to get used to as you will use that method if you are downloading other people’s repositories to collaborate or use their code.
Making a new repository on GitHub
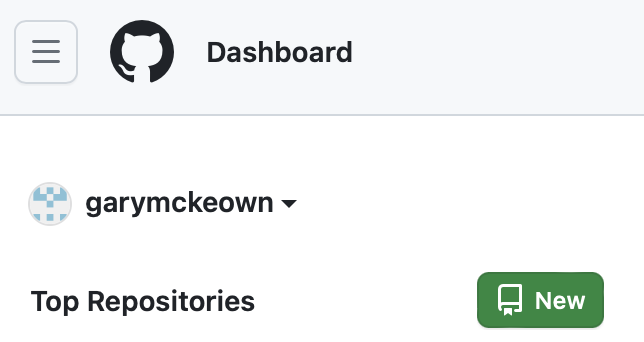
Click the big green button to create a new repository (Figure 7).
That will take you on to this page (Figure 8).
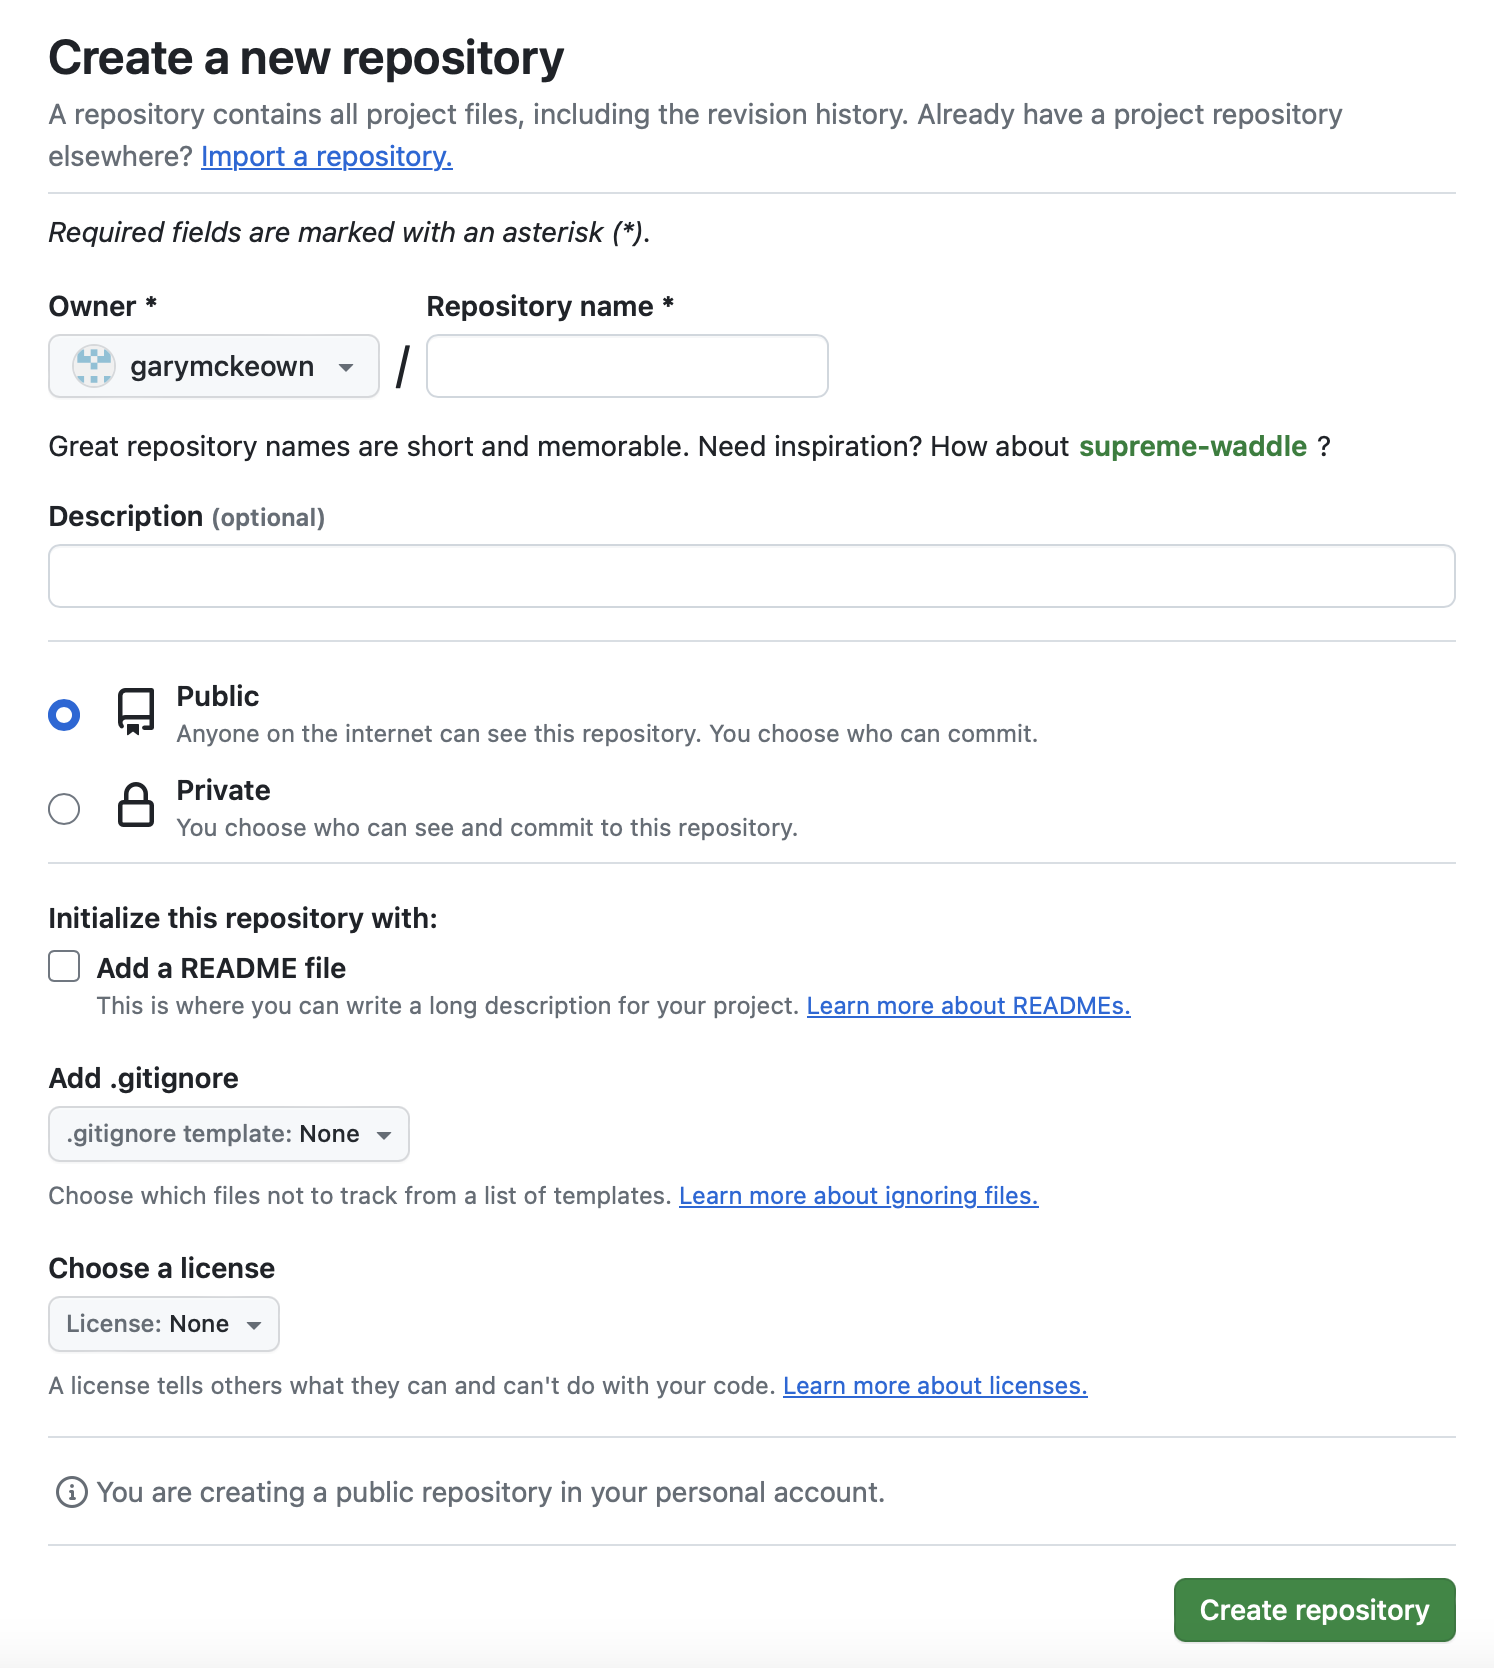
Give the repository a name, and a description. Decide whther tyou want to make it public or private—you can change this in the future. Add a README file. in Add .gitignore there are a number of templates that can be used to ignore common files you want to saty in your local repository, but do not upload to the GitHub repository; as I use R a lot I tend to use the R template, it is fine to choose no template though. You can also Choose a license. Initially it is safe to leave this as none, but you may want to inform yourself about the various licenses GitHub makes available. These are the classic software licenses, but they can pertain to open science documents, scientific code, and data too. The new repository will be created a show a page like the one in Figure 9.
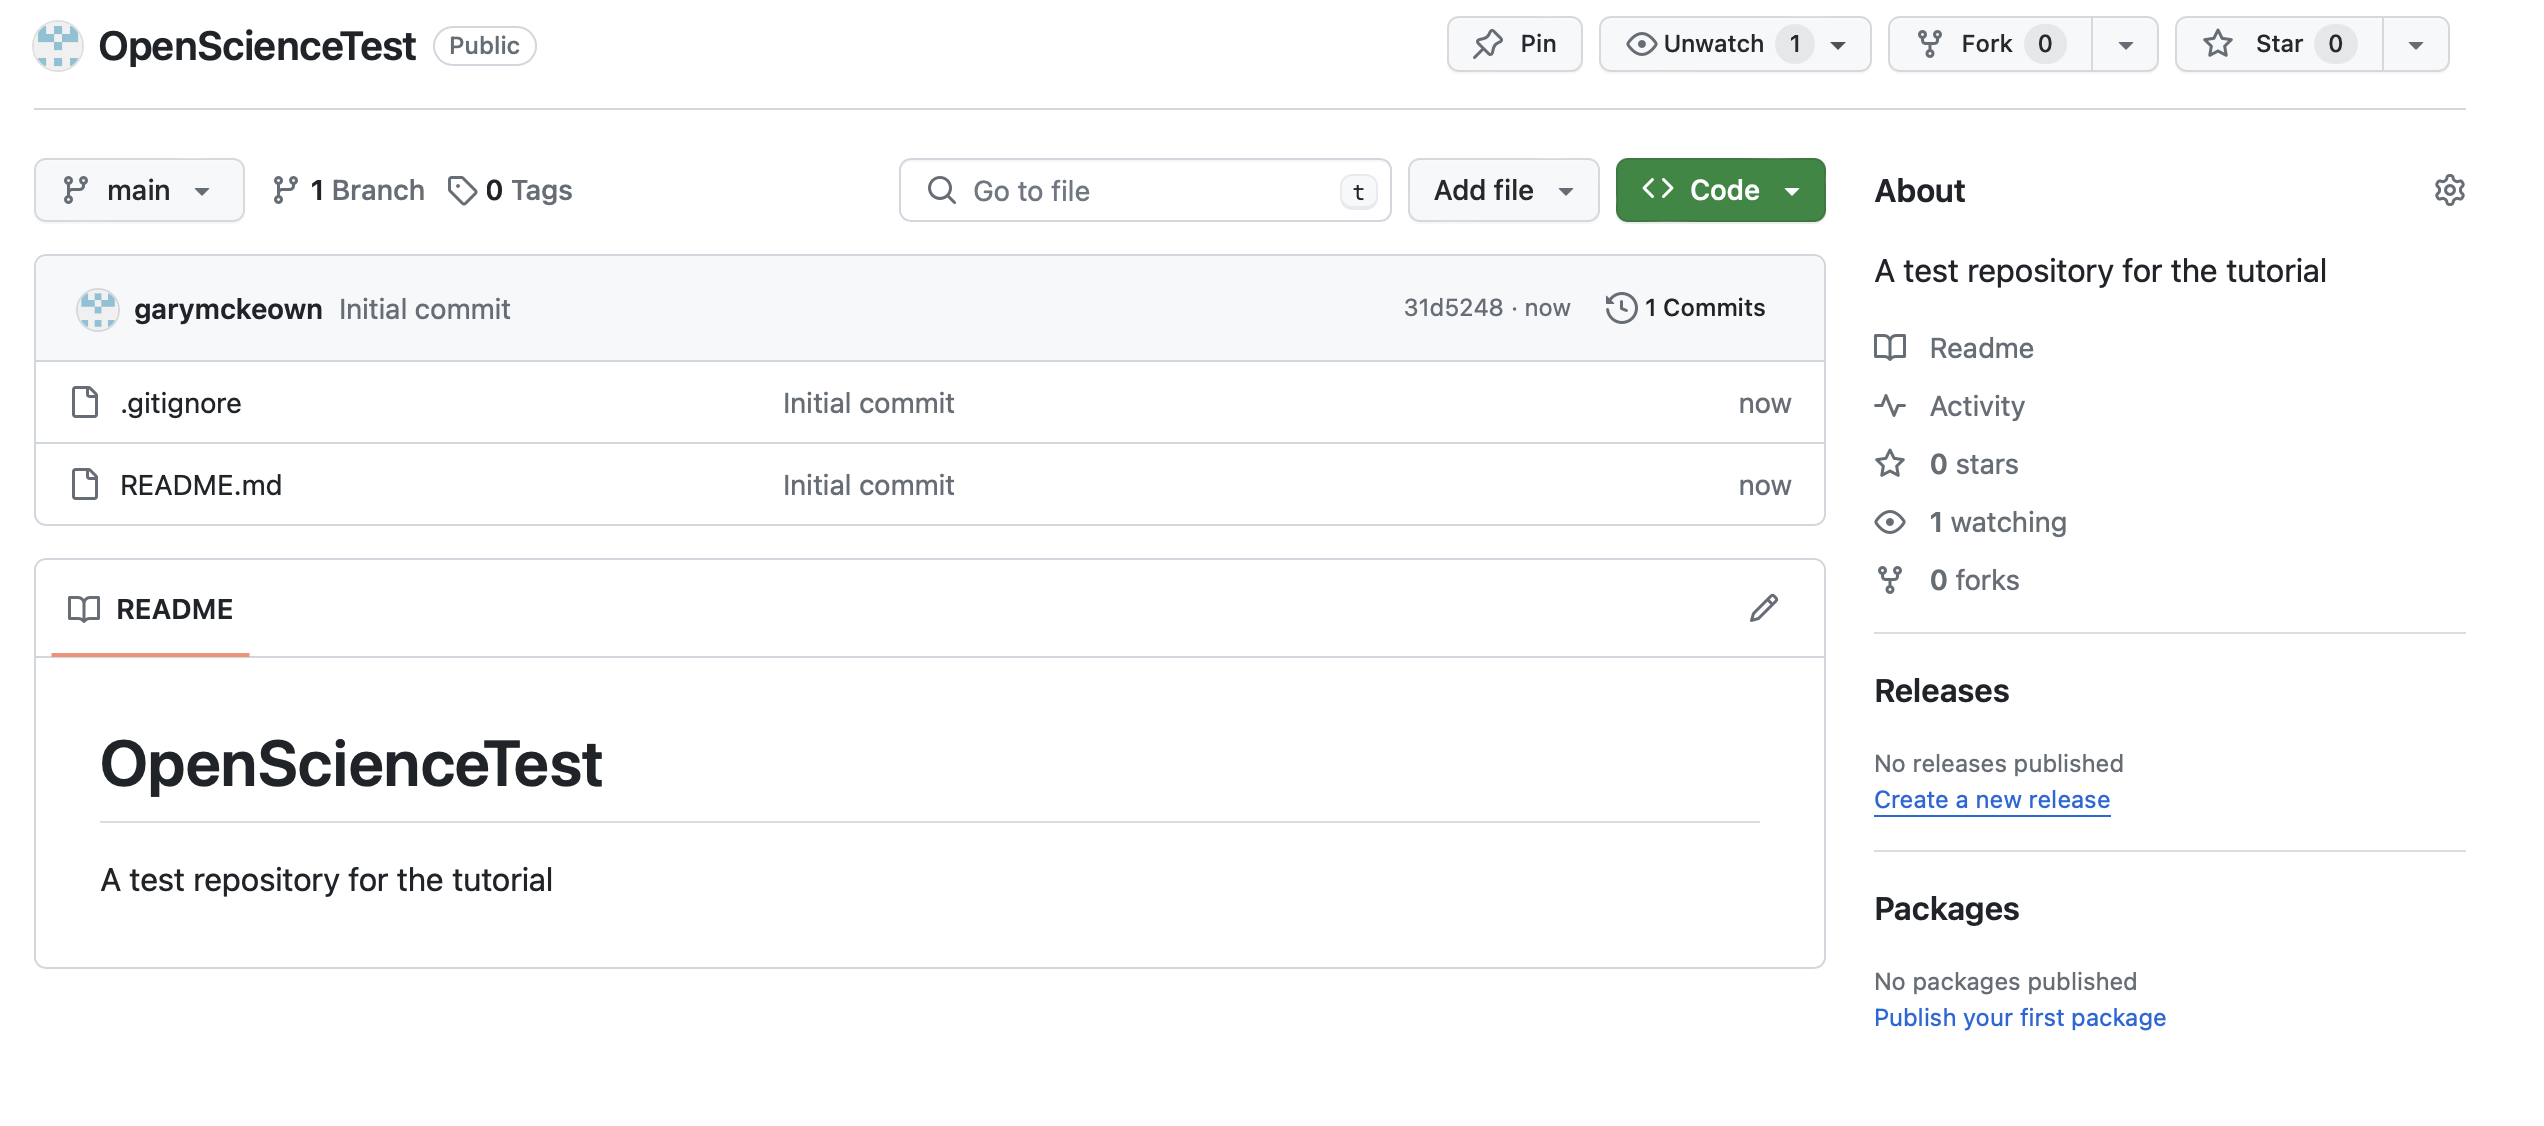
If you press the code button and select the copy button it will copy the necessary URL to the clipboard (Figure 10).

Make a local copy of the repository
The next step is to make a copy of the repository on your local computer in the directory that you wish to use.
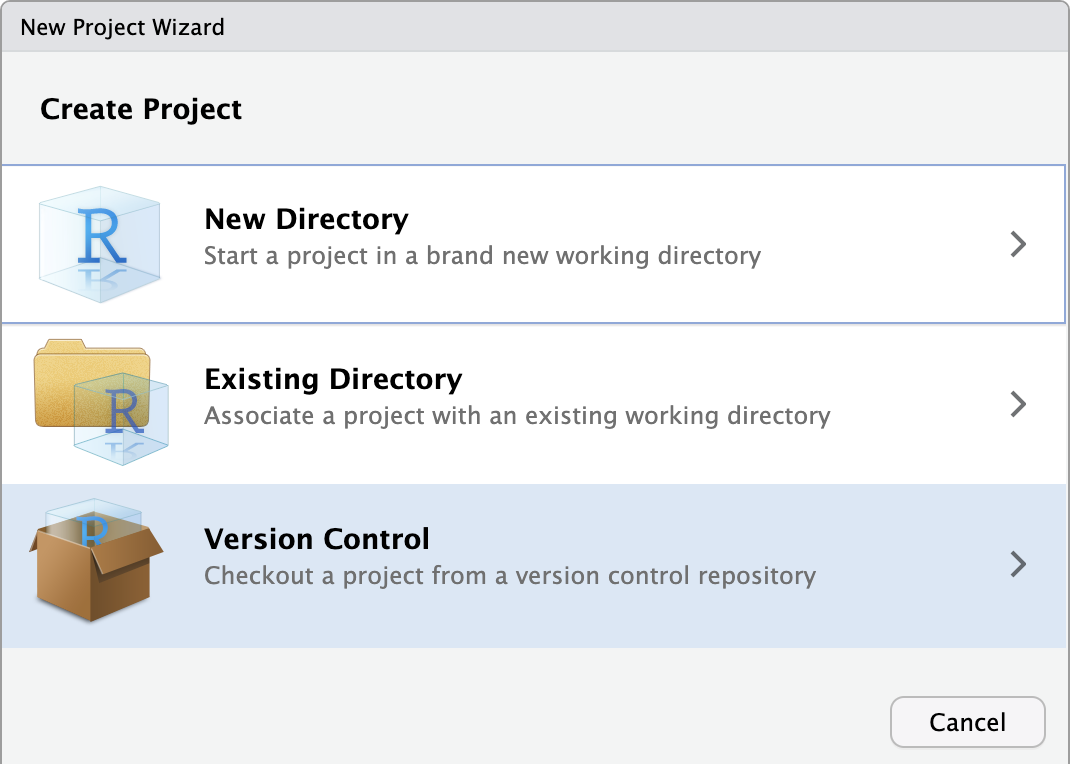
Within RStudio go to the File menu and select New Project… this opens the New Project Wizard. Selct Version Control (Figure 11).
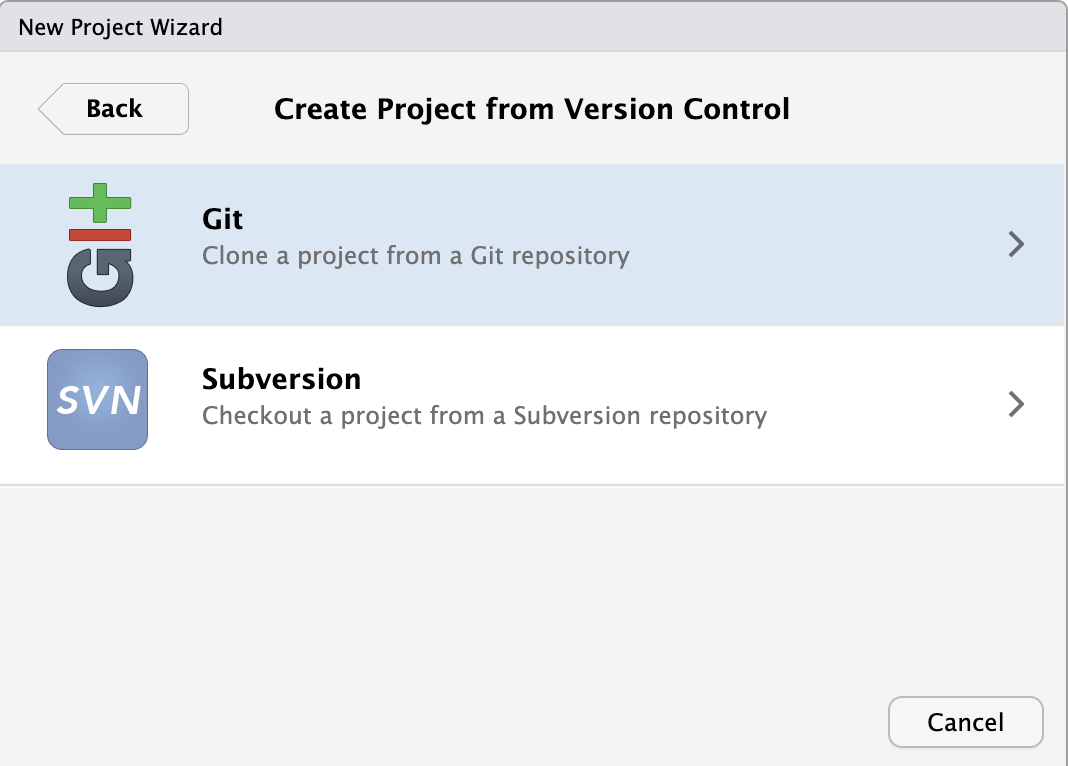
You are then given the option of two types of version control Subversion and Git. We choose Git (Figure 12).
The last page in this process gives the place to paste in the URL you copied from GitHub (Figure 13).
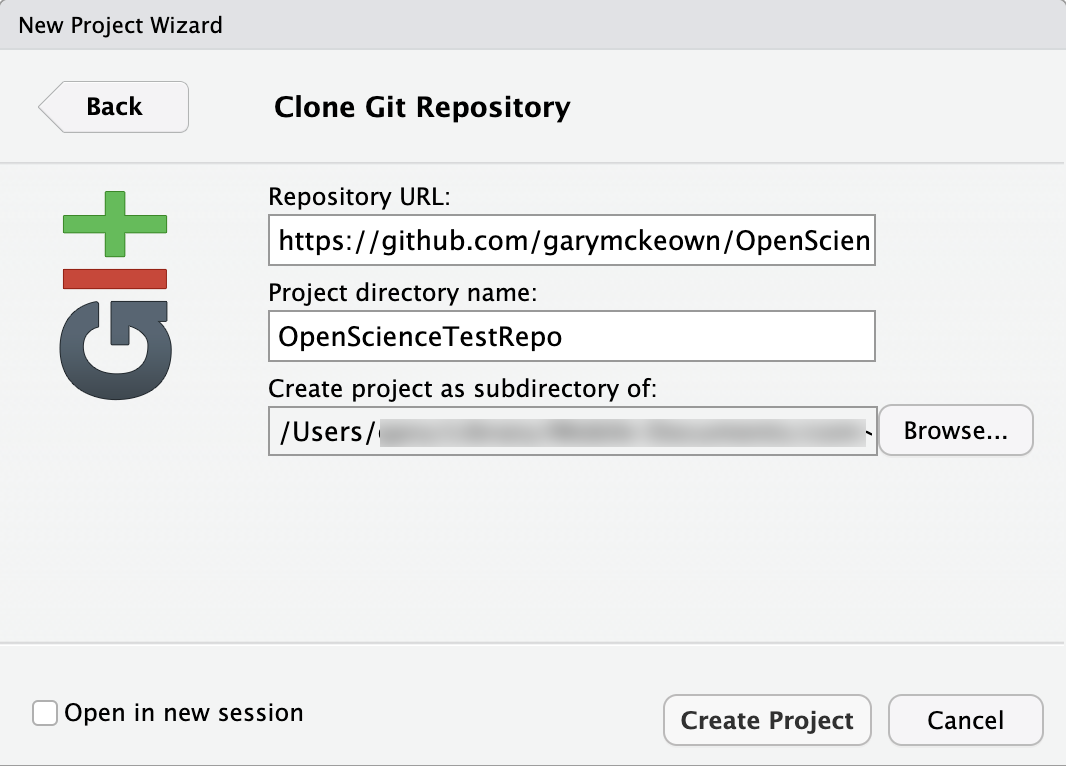
The process should then conclude by downloading the repository into the folder/directory that you have requested. You should then have a repository with Git already working and you should be able to commit changes to Git and push and pull then to GitHub. Your local repo is simply a folder/directory in your file, if you wish you can just delete as you would any folder, and start again by doing the process above.
To check if it is working you can make a change or add a file and commit it by pressing Commit button in the Git pane. You then select the staged button next to the altered file and add a Commit message—preferably something meaningful. Then hit the Commit button. That updates the changes to the local Git. You will also want to keep things synced with GitHub the remote server, to do this you need to do an additional stage of pushing the changes to GitHub, unsurprisingly, you do this by pressing the Push button in the Git pane. You should also be able to go to the GitHub wensite and check that your changes have now appeared there too.